How to replace the filter of Tapo Robot Vacuum
Gli aggiornamenti recenti potrebbero aver esteso l'accesso alle funzionalità discusse in questa FAQ. Visita la pagina di supporto del prodotto, seleziona la versione hardware corretta del dispositivo e controllae la scheda tecnica o la sezione firmware per gli ultimi miglioramenti aggiunti al prodotto. Nota che la disponibilità del prodotto varia a seconda della regione e alcuni modelli potrebbero non essere disponibili nella tua regione.
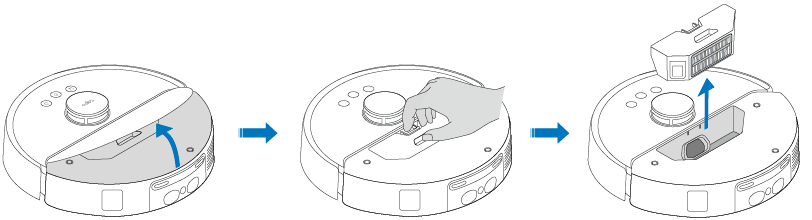
Replace the filter every 2-4 months.
Step 1. Remove the cover and take out the dustbin.
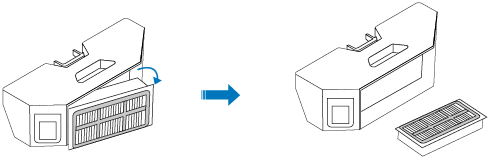
Step 2. Remove the filter from the dustbin and replace it with a new one.
Replace the filter every 3-6 months.
Step 1. Remove the dustbin.

Step 2. Open the lid.

Step 3. Remove the filter and install a new one.

Replace the filter every 3-6 months.
Step 1. Remove the dustbin and water tank.


Step 2. Remove the dustbin and open the lid.

Step 3. Remove the filter and install a new one.

Replace the filter every 3-6 months.
Step 1. Remove the dustbin and water tank.


Step 2. Remove the dustbin and open the lid.

Step 3. Remove the filter and install a new one.

Replace the filter every 3-6 months.
Step 1. Remove the dustbin.

Step 2. Remove the dustbin and open the lid.

Step 3. Remove the filter and install a new one.

Replace the filter every 3-6 months.
Step 1. Remove the dustbin and water tank.


Step 2. Remove the dustbin and open the lid.

Step 3. Remove the filter and install a new one.

Replace the filter every 3-6 months.
Step 1. Remove the dustbin and water tank.


Step 2. Remove the dustbin and open the lid.

Step 3. Remove the filter and install a new one.

Replace the filter every 3-6 months.
Step 1. Remove the dustbin.

Step 2. Remove the dustbin and open the lid.

Step 3. Remove the filter and install a new one.
