Setup Guide
Tapo S110E Setup Guide
Tapo S110E Smart Switch Module
Welcome to the setup guide.
To ensure equal access for all users, we offer this accessible setup guide. This guide is designed to meet accessibility needs, enabling a successful setup. It will introduce the appearance of your switch module and then guide you through the setup process.
Step 1. Know about your smart switch module
In this section, we will describe the switch module's appearance, including its ports, button, and label.
1. You can find your switch module and the three wires provided in the package.
2. Next, place the switch module on a flat, horizontal surface, like a shelf or desktop, ensuring that the button (only one button is present) is facing upwards.
3. After positioning your switch module correctly, we will introduce the ports, button, and label on your device in a certain order.
Terminals:
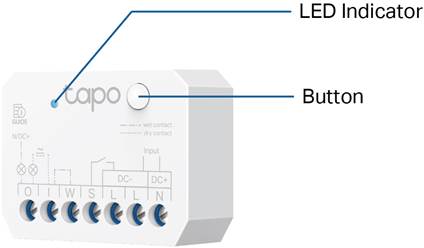
On the side of the device facing you, you can touch the seven terminals from left to right: O, I, W, S, L(DC-), L(DC-), N(DC+). They are used for connecting the wires.
On the upward side of the device, you can touch seven round holes. You can use a slotted screwdriver to tighten the screws in the holes, securing the terminated wires in place.
Button: On the upward side of the device, you can touch the button in the upper-right corner. When your switch module is powered on, you can press the button to turn the device on or off, or press and hold the button for 5 seconds to reset Wi-Fi while preserving other existing settings, or press and hold the button for 10 seconds to reset to factory default settings.
To prevent electric shocks, avoid touching the device after wiring. Use the device button only when powered by DC. Please use the Tapo app to set up, configure, or reset your device.
Product "Label": The product label is through laser engraving on the bottom of your device.

Step 2. Set Up
1. Get the Tapo app from the App Store or Google Play.

2. Power up your switch module. Wait 2 seconds for the switch module to start up.
3. Tap the + button in the app and select your device model. Follow the app instructions to complete the setup.
If you need help, please visit https://www.tapo.com/support/ for technical support, the user guide, FAQs, warranty & more.
For details on Tapo app accessibility, please check Accessibility Support.
English: Safety Information
Before installing, servicing or removing the switch module, read and follow all safety precautions including the following:
• Follow all national and local safety regulations and practices. If you are uncertain or uncomfortable when performing the installation, consult a qualified electrician.
• CAUTION – Risk of Electric Shock – An all-pole disconnect device may be required to de-energize the equipment before servicing. A circuit breaker which disconnects the Line and Neutral conductor simultaneously is suitable. Ensure power is off at the circuit breaker before removing or installing any switch module. Use a non-contact voltage tester to ensure the power is off.
• Do not install the Switch Module with wet hands or when standing on wet or damp surfaces.
• Keep the device away from water, fire, humidity or hot environments.
• Do not attempt to disassemble, repair, or modify the device. If you need service, please contact us.
• Do not use the device where wireless devices are not allowed.
• Tighten all screws before powering on, including unused screws, with a recommended torque of 0.4N·m.
• For wallbox installations, use the device with a wall switch and box that meet local regulations to ensure adequate wiring space and safe clearance.
• For indoor use only.
• The wire strip length should be between 5.5 and 7 mm.
• The max connection capacity of the terminal block is 2.5mm2.
• Do not overload the product. Ensure the 10A circuit breaker at the front of the product is functioning properly to prevent overloads.