How to fill the water tank for Tapo Robot Vacuum
Najnowsze aktualizacje mogą rozszerzyć dostęp do funkcji opisywanych w tym poradniku FAQ. Odwiedź stronę wsparcia swojego produktu, wybierz jego poprawną wersję sprzętową i sprawdź, czy w Karcie katalogowej lub sekcji Oprogramowanie zostały dodane poprawki do najnowszego oprogramowania Twojego urządzenia. Prosimy mieć na uwadze, że dostępność produktu różni się w zależności od regionu i pewne modele mogą nie być dostępne w Twojej lokalizacji.
Before You Start
• Fill with cool/room temperature water only. Be careful not to wet the metal contacts.
• Use only cleaning agents specified by Tapo. Others may corrode the water tank.
Notes:
- Do NOT add any cleaning solution to the water tank. Install the provided Tapo cleaning solution in the dock instead. Manually adding cleaning solution to the water tank may cause damage to the water system and void the warranty.
- Do NOT add hot water to the water tank to avoid shortening its service life.
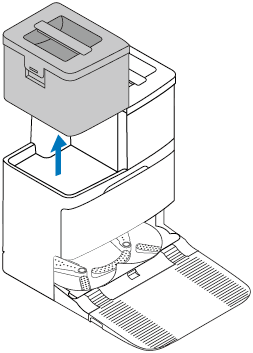
Step 1. Remove the clean water tank.

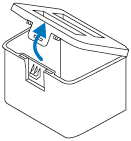
Step 2. Open the clean water tank.

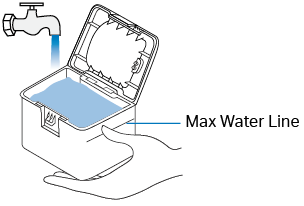
Step 3. Fill the tank with water to the Max water line.

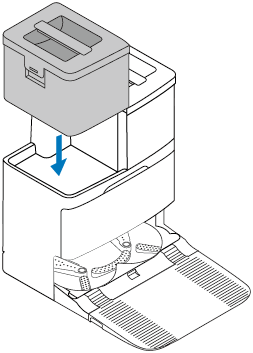
Step 4. Close the lid, lock the latch, and reinstall the tank onto the dock with a slight press for proper installation.

Step 1. Take out the dustbin and water tank.

Step 2. Remove the rubber plug and add water to the water tank.
Note: To prevent corrosion, do NOT add any cleaning agents. Only use cool or room temperature water and be careful not to wet the metal contacts.

Step 3. Wipe the water tank with a clean, dry cloth.

Step 4. Re-install the dustbin and water tank.

Step 1. Take out the dustbin and water tank.

Step 2. Remove the rubber plug and add water to the water tank.
Note: To prevent corrosion, do NOT add any cleaning agents. Only use cool or room temperature water and be careful not to wet the metal contacts.

Step 3. Wipe the water tank with a clean, dry cloth.

Step 4. Re-install the dustbin and water tank.

Step 1. Take out the dustbin and water tank.

Step 2. Remove the rubber plug and add water to the water tank.

Step 3. Re-install the dustbin and water tank.

Step 1. Take out the dustbin and water tank.

Step 2. Remove the rubber plug and add water to the water tank.

Step 3. Re-install the dustbin and water tank.

Step 1. Take out the dustbin and water tank.

Step 2. Remove the rubber plug and add water to the water tank.

Step 3. Re-install the dustbin and water tank.

Step 1. Take out the dustbin and water tank.

Step 2. Remove the rubber plug and add water to the water tank.

Step 3. Re-install the dustbin and water tank.
