How to Replace the Filter of Tapo Robot Vacuum
Recent updates may have expanded access to feature(s) discussed in this FAQ. Visit your product's support page, select the correct hardware version for your device, and check either the Datasheet or the firmware section for the latest improvements added to your product. Please note that product availability varies by region, and certain models may not be available in your region.
Replace the filter every 2-4 months.
Step 1. Remove the cover and take out the dustbin.
Step 2. Remove the filter from the dustbin and replace it with a new one. Ensure that the arrow on the right side faces outward during installation.
Replace the filter every 3-6 months.
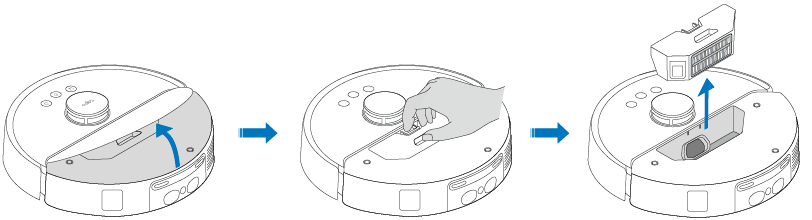
Step 1. Remove the dustbin.

Step 2. Open the lid.

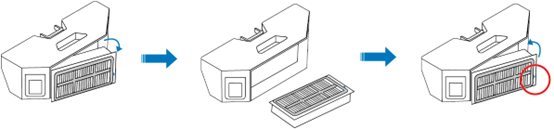
Step 3. Remove the filter and install a new one.

Replace the filter every 3-6 months.
Step 1. Remove the dustbin and water tank.


Step 2. Remove the dustbin and open the lid.

Step 3. Remove the filter and install a new one.

Replace the filter every 3-6 months.
Step 1. Remove the dustbin and water tank.


Step 2. Remove the dustbin and open the lid.

Step 3. Remove the filter and install a new one.

Replace the filter every 3-6 months.
Step 1. Remove the dustbin.

Step 2. Remove the dustbin and open the lid.

Step 3. Remove the filter and install a new one.

Replace the filter every 3-6 months.
Step 1. Remove the dustbin and water tank.


Step 2. Remove the dustbin and open the lid.

Step 3. Remove the filter and install a new one.

Replace the filter every 3-6 months.
Step 1. Remove the dustbin and water tank.


Step 2. Remove the dustbin and open the lid.

Step 3. Remove the filter and install a new one.

Replace the filter every 3-6 months.
Step 1. Remove the dustbin.

Step 2. Remove the dustbin and open the lid.

Step 3. Remove the filter and install a new one.
