FAQs
How to waterproof Tapo wired outdoor security cameras
TC40, TC40GW, TC41, TC43, TC65, TCA41, Tapo C310, Tapo C320WS, Tapo C325WB, Tapo C500, Tapo C501GW, Tapo C510W, Tapo C520WS, Tapo C52A, Tapo C530WS
04-08-2022
128,093
Recent updates may have expanded access to feature(s) discussed in this FAQ. Visit your product's support page, select the correct hardware version for your device, and check either the Datasheet or the firmware section for the latest improvements added to your product. Please note that product availability varies by region, and certain models may not be available in your region.
You may refer to the video first:
Introduction
To prevent water ingress, install waterproof accessories and ensure all components are securely fitted with waterproof rings when installing Tapo Wired Outdoor Cameras.
Installation
Step 1. Install Waterproof Cable Attachments for the network interface
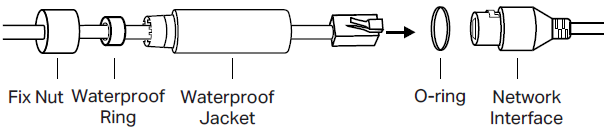
- Route the network cable through the following components in order: fix nut, waterproof ring, and then the waterproof jacket.
- Insert the waterproof ring into the waterproof jacket.
- Fix the O-ring to the network interface of the camera and connect the network cables.
- Attach the network interface to the waterproof jacket, then twist to lock. Rotate the fix nut to secure it to the waterproof jacket.
Step 2. Install Waterproof Seal for Power Connectors

To get to know more details of each function and configuration please go to Download Center to download the manual of your product.
Copyright © 2026 TP-Link System Inc. All rights reserved.