How to fill the water tank for Tapo Robot Vacuum
Door recente updates is de toegang tot genoemde functie(s) in deze FAQ mogelijk uitgebreid. Ga naar de ondersteuningspagina van uw product, selecteer de juiste hardwareversie voor uw apparaat en controleer de sectie Gegevensblad of Firmware voor de laatste verbeteringen die aan uw product zijn toegevoegd. Let op: De productbeschikbaarheid verschilt per regio en sommige modellen zijn mogelijk niet beschikbaar in uw regio.
Introduction
This article introduces step-by-step instructions to fill the water tank for Tapo Robot Vacuum.
Requirements
- Fill with cool/room temperature water only. Be careful not to wet the metal contacts.
- Use only cleaning agents specified by Tapo. Others may corrode the water tank.
Note: Only RV50 and newer models support Tapo cleaning solution. For all other robot vacuum models that do not support cleaning solutions, please fill the water tank with clean water only.
Configuration
Notes:
- Do NOT add any cleaning solution to the water tank. Install the provided Tapo cleaning solution in the dock instead. Manually adding cleaning solution to the water tank may cause damage to the water system and void the warranty.
- Do NOT add hot water to the water tank to avoid shortening its service life.
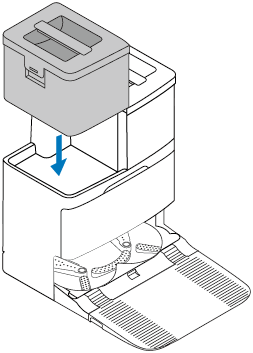
Step 1. Remove the clean water tank.

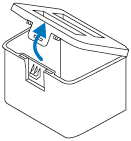
Step 2. Open the clean water tank.
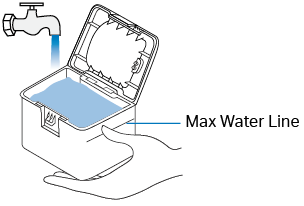
Step 3. Fill the tank with water to the Max water line.
Step 4. Close the lid, lock the latch, and reinstall the tank onto the dock with a slight press for proper installation.
Step 1. Take out the dustbin and water tank.

Step 2. Remove the rubber plug and add water to the water tank.
Note: To prevent corrosion, do NOT add any cleaning agents. Only use cool or room temperature water and be careful not to wet the metal contacts.

Step 3. Wipe the water tank with a clean, dry cloth.

Step 4. Re-install the dustbin and water tank.

Step 1. Take out the dustbin and water tank.

Step 2. Remove the rubber plug and add water to the water tank.

Step 3. Re-install the dustbin and water tank.

Step 1. Take out the dustbin and water tank.

Step 2. Remove the rubber plug and add water to the water tank.

Step 3. Re-install the dustbin and water tank.

Step 1. Take out the dustbin and water tank.

Step 2. Remove the rubber plug and add water to the water tank.

Step 3. Re-install the dustbin and water tank.

Step 1. Take out the dustbin and water tank.

Step 2. Remove the rubber plug and add water to the water tank.

Step 3. Re-install the dustbin and water tank.
