How to replace the filter of Tapo Robot Vacuum
Door recente updates is de toegang tot genoemde functie(s) in deze FAQ mogelijk uitgebreid. Ga naar de ondersteuningspagina van uw product, selecteer de juiste hardwareversie voor uw apparaat en controleer de sectie Gegevensblad of Firmware voor de laatste verbeteringen die aan uw product zijn toegevoegd. Let op: De productbeschikbaarheid verschilt per regio en sommige modellen zijn mogelijk niet beschikbaar in uw regio.
Replace the filter every 2-4 months.
Step 1. Remove the cover and take out the dustbin.
Step 2. Remove the filter from the dustbin and replace it with a new one.
Replace the filter every 3-6 months.
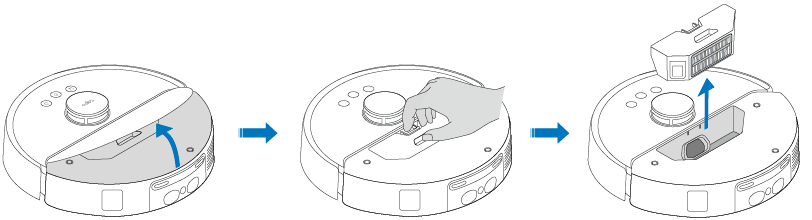
Step 1. Remove the dustbin.

Step 2. Open the lid.

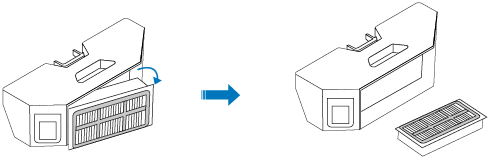
Step 3. Remove the filter and install a new one.

Replace the filter every 3-6 months.
Step 1. Remove the dustbin and water tank.


Step 2. Remove the dustbin and open the lid.

Step 3. Remove the filter and install a new one.

Replace the filter every 3-6 months.
Step 1. Remove the dustbin and water tank.


Step 2. Remove the dustbin and open the lid.

Step 3. Remove the filter and install a new one.

Replace the filter every 3-6 months.
Step 1. Remove the dustbin.

Step 2. Remove the dustbin and open the lid.

Step 3. Remove the filter and install a new one.

Replace the filter every 3-6 months.
Step 1. Remove the dustbin and water tank.


Step 2. Remove the dustbin and open the lid.

Step 3. Remove the filter and install a new one.

Replace the filter every 3-6 months.
Step 1. Remove the dustbin and water tank.


Step 2. Remove the dustbin and open the lid.

Step 3. Remove the filter and install a new one.

Replace the filter every 3-6 months.
Step 1. Remove the dustbin.

Step 2. Remove the dustbin and open the lid.

Step 3. Remove the filter and install a new one.
